
30-10-023
Fusion 4 Additive Spares
Honeywell Process Solutions
Request a Quote
In Stock
Check Valve-For Mbiii
30-01-37-20
Fusion 4 Additive Spares
Honeywell Process Solutions
Request a Quote
In Stock
Mbiii 90Deg Standard Cal Point (3/8 Npt)
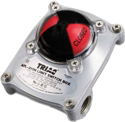
APL-5-10-N-30
APL Series CSA Approved Limit Switch
A-T Controls
Request a Quote
Out of Stock
A-T CONTROLS Limit Switch, CSA Flameproof, (2) SPDT, Aluminum Enclosure, 2-Way Dome Indicator, SST Mounting Bracket (2R20-2R300), SST Mounting Bracket (2R500-2R3500)
APL-3-10-T-30
APL Series CSA Approved Limit Switch
A-T Controls
Request a Quote
Out of Stock
APL-5-10-L-30
APL Series CSA Approved Limit Switch
A-T Controls
Request a Quote
Out of Stock
APL-3-10-N-30
APL Series CSA Approved Limit Switch
A-T Controls
Request a Quote
Out of Stock
APL-3-10-L-30
APL Series CSA Approved Limit Switch
A-T Controls
Request a Quote
Out of Stock

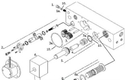
10-31702
Mono-BlockTM II+
Honeywell Process Solutions
Request a Quote
In Stock
MBII+, Diverter body, Figure #10